Instructions

logan’s take and bake rolls instructions

Logans Take and Bake Rolls Instructions: A Comprehensive Guide

Logans Roadhouse offers convenient take and bake rolls, bringing their famous yeast rolls to your home! Enjoy a restaurant-quality experience with minimal effort, baking in just 10 minutes.

Understanding Logans Roadhouse Rolls

Logans Roadhouse has become synonymous with incredibly soft, buttery, and slightly sweet yeast rolls. These aren’t just a side dish; they’re a cornerstone of the Logans dining experience, often cited as a primary reason for customer loyalty. The recipe, carefully guarded for years, centers around a homemade yeast dough, resulting in a uniquely tender crumb and a flavor profile that’s both comforting and addictive.

What sets these rolls apart is the generous application of melted butter, often served with a sprinkle of cinnamon. The rolls are traditionally served warm, enhancing their aroma and texture. Logans understands the importance of these rolls, even extending their availability through take and bake options, allowing customers to recreate the experience at home. The consistent quality and delightful taste have cemented their place as a beloved American comfort food.

These rolls are a testament to simple ingredients expertly combined, creating a truly memorable culinary delight.

What are Take and Bake Rolls?

Take and bake rolls represent a convenient bridge between bakery-fresh goodness and home-baked comfort. Unlike fully baked rolls, these are sold in a partially prepared state – typically unbaked dough, pre-portioned and ready for the oven. This allows consumers to enjoy the aroma and taste of freshly baked goods without the time and effort of traditional baking.

The concept gained popularity as a way to offer a premium, homemade experience without requiring extensive baking skills. Logans Roadhouse’s take and bake offering specifically delivers their signature yeast roll dough directly to your kitchen. You simply follow the baking instructions, and within minutes, you have warm, delicious rolls that rival those served in the restaurant.

It’s a perfect solution for busy individuals or families craving a special treat without the fuss. Essentially, it’s the best of both worlds – bakery quality with home-baked convenience!

The Appeal of Logans Rolls

Logans Roadhouse rolls have cultivated a devoted following, becoming synonymous with the restaurant’s overall dining experience. Their appeal lies in a unique combination of texture and flavor – a soft, fluffy interior with a slightly sweet, buttery taste. These aren’t just any dinner rolls; they’re a highlight of the meal for many patrons.

The secret reportedly lies in a homemade yeast roll recipe, carefully crafted to achieve that perfect consistency. The aroma alone is enough to entice, and their ability to complement Logans’ hearty American fare makes them incredibly popular.

The take and bake version extends this enjoyment beyond the restaurant walls. Now, you can recreate that Logans experience at home, enjoying warm, fresh rolls with your family. It’s a taste of comfort, convenience, and a little bit of Logans magic, all in one delicious package!

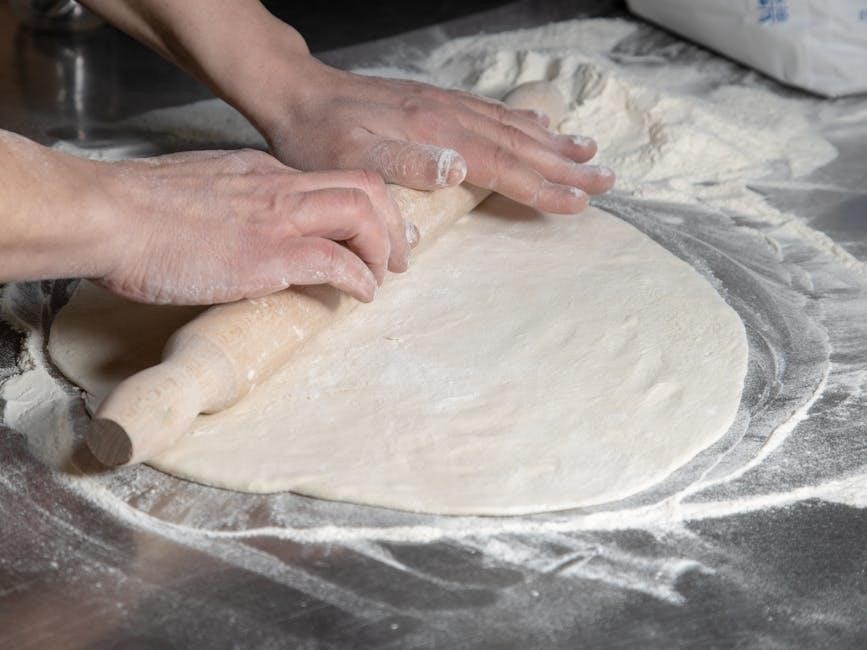
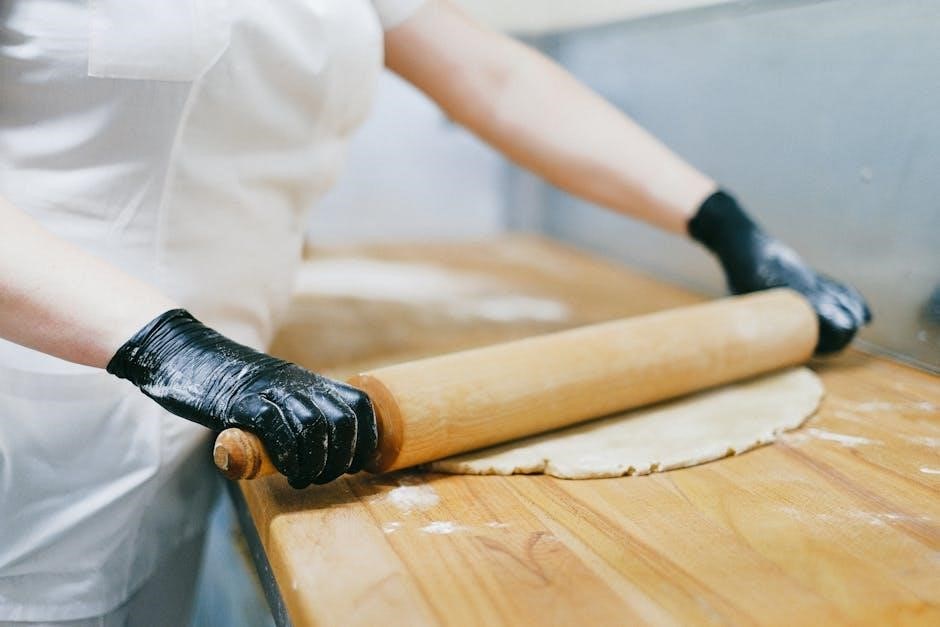
Preparing to Bake Your Logans Rolls

Before baking, review the package instructions for specific details. Gather a baking sheet and ensure the rolls are at optimal room temperature for proper rising.

Checking the Package Instructions

Prior to initiating the baking process, meticulously examine the packaging of your Logans Take and Bake Rolls. The package contains crucial, specific guidance tailored to that particular batch, ensuring optimal results. Pay close attention to any stated rise times, as these can vary.

Specifically, note the recommended baking temperature and duration. While 350°F (175°C) is a common setting, always defer to the package instructions if a different temperature is indicated. The package will also detail if any special preparation is needed, such as lightly greasing the baking sheet or covering the rolls during the initial baking phase.

Furthermore, check for any allergy information or ingredient lists if dietary restrictions are a concern. Ignoring these details could lead to unsatisfactory results or potential health issues. The package is your primary resource for a successful baking experience, so read it thoroughly!

Necessary Baking Equipment

To successfully bake your Logans Take and Bake Rolls, gathering the right equipment is essential. A standard baking sheet is the foundation; consider using a non-stick surface or lining it with parchment paper to prevent sticking and ensure easy cleanup. An oven, of course, capable of reaching 350°F (175°C) is required, and an oven thermometer is helpful for accuracy.

Additionally, a clean kitchen towel will be useful for covering the rolls during the rising process, creating a warm and humid environment. A timer is crucial for precise baking, preventing over or under-baking. While not strictly necessary, a pastry brush can be used to lightly glaze the rolls with melted butter for added richness and a golden-brown finish.

Finally, having a cooling rack available allows the baked rolls to cool evenly, maintaining their soft texture. Ensure all equipment is clean and in good working order before you begin for a smooth and enjoyable baking experience.

Optimal Room Temperature for Rising

Achieving the perfect rise is crucial for fluffy Logans Take and Bake Rolls. The ideal room temperature for this process falls between 68°F and 75°F (20°C ⎼ 24°C). This range provides a warm enough environment for the yeast to activate and expand the dough without being excessively hot, which could kill the yeast.

Avoid placing the rolls in direct sunlight or near drafts, as these can create uneven temperatures. A consistently warm spot, like a kitchen counter away from cold windows, is best. If your kitchen is cooler, you can create a warmer environment by placing the rolls in a slightly warmed (but turned off!) oven or near a warm appliance.

Allowing the rolls to rise for 4 to 6 hours, or until doubled in size, is generally recommended. Patience is key; a proper rise ensures a light and airy texture. Monitor the dough’s progress and adjust rising time as needed based on your room’s temperature.

Baking Instructions: Step-by-Step

Follow these simple steps for perfectly baked Logans Take and Bake Rolls! Preheat your oven, arrange the rolls, and bake for 8-10 minutes at 350°F.

Preheating Your Oven

Proper oven preheating is crucial for achieving the ideal texture in your Logans Take and Bake Rolls. Begin by setting your oven to 350°F (175°C). Allow sufficient time for the oven to reach this temperature – typically around 10-15 minutes, depending on your appliance.

Using an oven thermometer is highly recommended to ensure accuracy, as oven dials can sometimes be inaccurate. A consistently heated oven guarantees even baking, preventing some rolls from being undercooked while others are overdone.

Ensure the oven rack is positioned in the middle. This placement promotes uniform heat distribution around the rolls. Avoid opening the oven door frequently during preheating, as this can cause temperature fluctuations. Patience during this initial step sets the foundation for fluffy, golden-brown Logans Rolls!

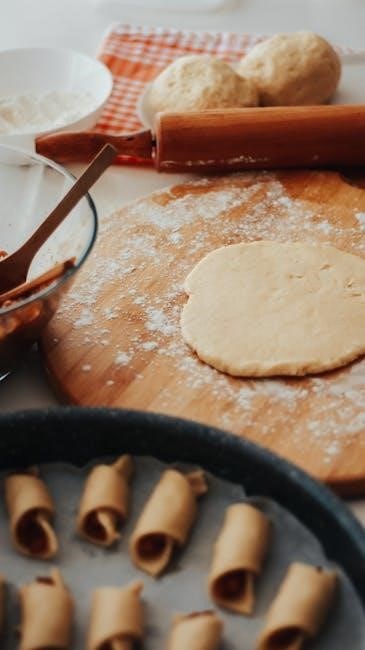
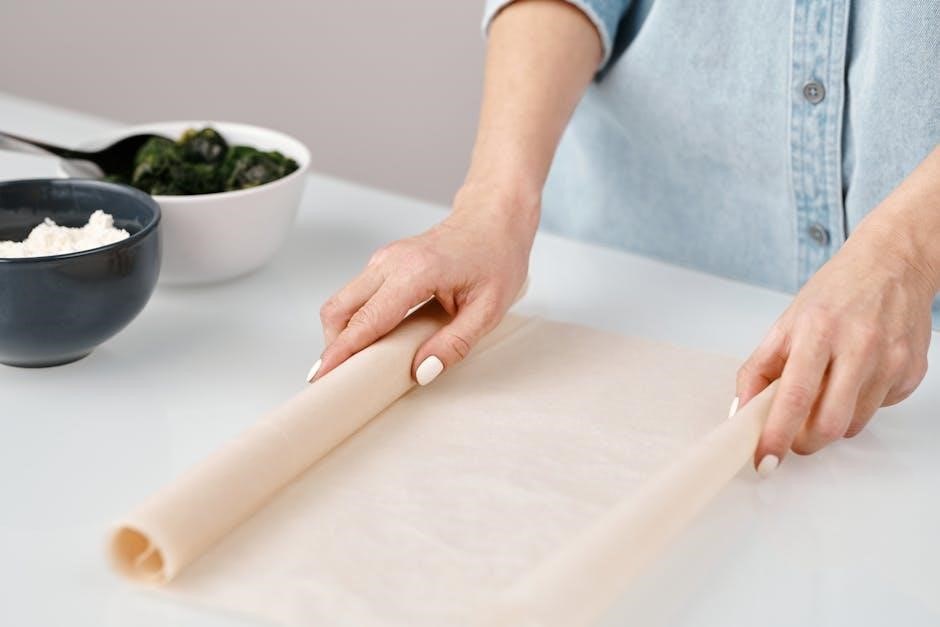
Arranging the Rolls on a Baking Sheet

Carefully remove the Logans Take and Bake Rolls from their packaging. A lightly greased or parchment paper-lined baking sheet is essential to prevent sticking and ensure easy removal. Gently place the rolls onto the prepared baking sheet, leaving approximately 1-2 inches of space between each roll.

This spacing allows for proper heat circulation during baking, contributing to even cooking and a delightful, fluffy texture. Avoid overcrowding the baking sheet, as this can lead to unevenly baked rolls. If necessary, use two baking sheets to accommodate all the rolls comfortably.

Do not attempt to separate the rolls before baking; they are designed to bake connected. Ensure the rolls are placed flat on the baking sheet for consistent browning. Proper arrangement is key to achieving Logans Roadhouse quality at home!

Baking Time and Temperature (350°F/175°C)

Preheat your oven to 350°F (175°C) – this is crucial for optimal rising and baking. Place the baking sheet with the arranged Logans Take and Bake Rolls onto the middle rack of the preheated oven. Bake for approximately 8-10 minutes, though baking times may slightly vary depending on your oven.

Begin checking for doneness around the 8-minute mark. The rolls are ready when they are golden brown on top and sound hollow when lightly tapped. Avoid opening the oven door frequently during baking, as this can cause temperature fluctuations and affect the rise.

Consistent temperature is key to achieving that signature Logans Roadhouse texture. A slightly longer baking time won’t harm the rolls, but overbaking will result in dryness. Monitor closely and enjoy the aroma as your kitchen fills with the scent of freshly baked goodness!

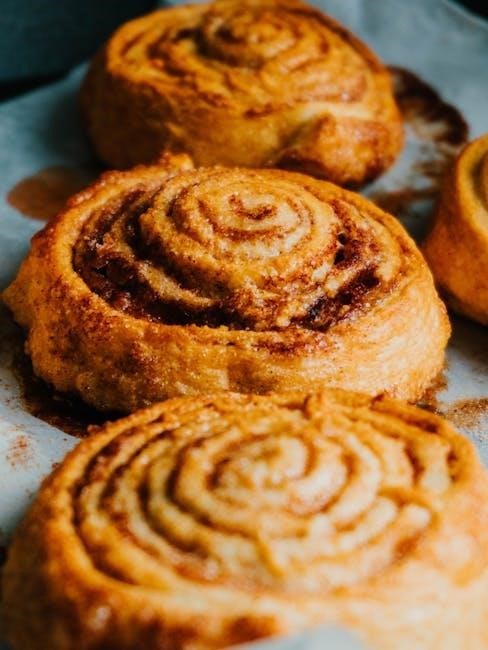
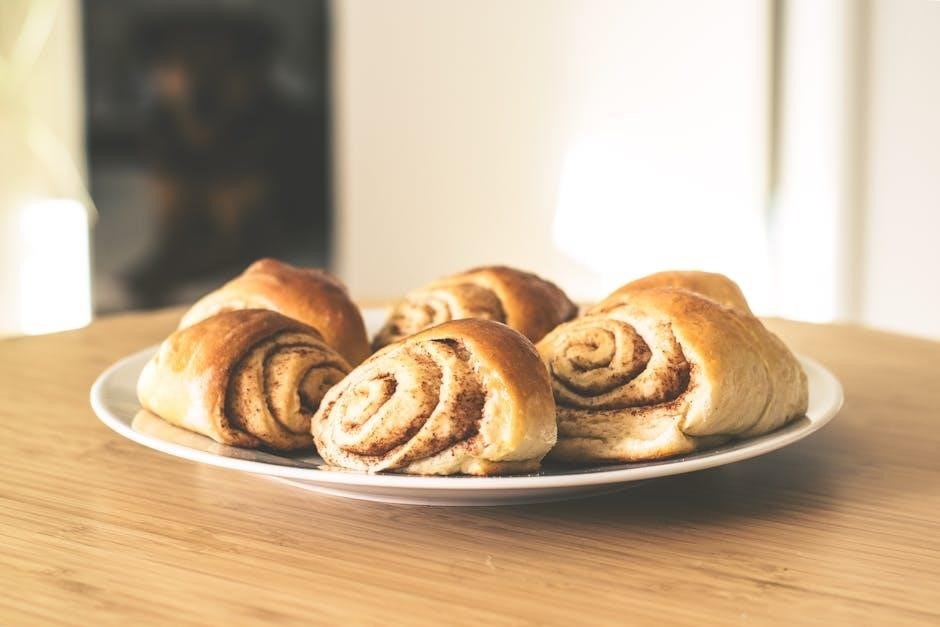
Achieving the Perfect Texture

Golden brown color and a hollow sound when tapped indicate doneness. Proper baking yields soft, fluffy interiors, mirroring the beloved Logans Roadhouse experience.

Determining Doneness: Visual Cues

Successfully baking Logans Take and Bake Rolls relies on recognizing key visual indicators. The most prominent cue is a beautiful, golden-brown color across the tops of the rolls. This indicates the Maillard reaction has occurred, creating that desirable flavor and texture.

Beyond color, gently tapping on a roll should produce a hollow sound. This signifies that the interior has fully cooked and is no longer doughy. Avoid relying solely on baking time, as ovens vary.

Observe the rolls closely during the final minutes of baking. If they are browning too quickly, you can loosely tent them with aluminum foil to prevent burning while ensuring the inside continues to cook through;

Remember, a slightly golden hue is preferable to pale, underbaked rolls. Consistent visual checks are the best way to guarantee perfectly baked, restaurant-quality Logans Rolls at home!

Avoiding Overbaking

Overbaking Logans Take and Bake Rolls is a common pitfall, leading to dry, hard rolls that lack the signature soft texture. The key to prevention lies in vigilant monitoring during the final stages of baking. Start checking for doneness a couple of minutes before the recommended baking time concludes.

Pay close attention to the color; a light golden-brown is ideal, while a deep, dark brown signals impending dryness. If the rolls appear to be browning too rapidly, reduce the oven temperature slightly or loosely cover them with aluminum foil.

Remember, carryover cooking will continue even after you remove the rolls from the oven. Therefore, it’s better to err on the side of slightly underbaked than overbaked. A gentle press should reveal a slight give, indicating a soft interior.

Prioritize a moist, fluffy texture – the hallmark of a perfect Logans roll – by carefully observing these cues and adjusting your baking accordingly.

Ensuring a Soft and Fluffy Interior

Achieving a delightfully soft and fluffy interior in your Logans Take and Bake Rolls requires attention to both preparation and baking technique. Proper rising is paramount; allowing the rolls sufficient time at a comfortable room temperature – typically 4 to 6 hours – encourages optimal yeast activity.

This results in a lighter, airier crumb. Avoid rushing this process, as under-proofed rolls will be dense. During baking, maintaining the correct temperature (350°F/175°C) is crucial. Too high a temperature can cause the exterior to cook too quickly, trapping a dense core.

A gentle touch when handling the dough also helps preserve its delicate structure. Avoid excessive kneading or pressing. Finally, a brief cooling period on a wire rack after baking prevents condensation and maintains that coveted fluffy texture.

Enjoy the taste of Logans Roadhouse with every bite!

Storage and Reheating

Leftover Logans Take and Bake Rolls can be stored in airtight containers or Ziploc bags. Reheat for optimal flavor and texture, enjoying their deliciousness!

Storing Leftover Rolls

Proper storage is key to maintaining the freshness and delightful taste of your Logans Take and Bake Rolls. Once cooled completely after baking (or reheating), transfer any remaining rolls to an airtight container. This prevents them from drying out and absorbing unwanted odors from the refrigerator.

Alternatively, you can place the rolls in a resealable plastic bag, ensuring all air is squeezed out before sealing. This method is particularly effective for short-term storage. Stored correctly, Logans Rolls will generally remain palatable for up to two to three days in the refrigerator.

However, for extended preservation of their quality, consider freezing. Individually wrap each roll in plastic wrap before placing them in a freezer-safe bag or container. This prevents freezer burn and helps maintain their texture. Properly frozen, these rolls can be enjoyed for up to two months, offering a convenient treat whenever the craving strikes!

Reheating Options for Best Results

To recapture the warm, soft goodness of freshly baked Logans Take and Bake Rolls, several reheating methods are available. For a quick refresh, wrap a roll in a slightly damp paper towel and microwave for 10-15 seconds. Be cautious not to overheat, as this can make them tough.

For a more even and flavorful reheat, preheat your oven to 350°F (175°C). Place the rolls on a baking sheet and warm for 5-7 minutes, or until heated through. This method helps restore some of the original texture. Another excellent option is using a toaster oven, which provides focused heat for a crispy exterior and soft interior.

Wrapping the roll in foil during oven reheating helps retain moisture. Regardless of the method chosen, avoid prolonged heating to prevent dryness. A light brush of melted butter after reheating enhances the flavor and adds a delightful sheen, bringing you closer to that Logans Roadhouse experience!

Freezing for Longer Storage

To preserve Logans Take and Bake Rolls for extended periods, freezing is an excellent option. Allow the baked rolls to cool completely before wrapping them individually in plastic wrap. This prevents freezer burn and maintains their texture. Subsequently, place the wrapped rolls into a freezer-safe bag or airtight container.

Properly frozen rolls can maintain good quality for up to two to three months. When ready to enjoy, thaw the rolls overnight in the refrigerator or for a few hours at room temperature. For a quick thaw, you can use the defrost setting on your microwave, but be mindful not to cook them during the process.

Reheating thawed rolls in the oven at 350°F (175°C) for 5-7 minutes will help restore their soft, fluffy texture. Freezing is ideal for enjoying Logans’ delicious rolls whenever the craving strikes, ensuring minimal waste and maximum enjoyment!

Logans Roadhouse Locations & Gift Cards

Logans Roadhouse has locations across the US, offering their full menu and a family-friendly atmosphere. Check your gift card balance online or at a restaurant!

Finding a Logans Roadhouse Near You

Logans Roadhouse boasts a widespread presence across the United States, making it relatively easy to find a location convenient for enjoying their renowned American cuisine. Currently, you can find Logans in states including Alabama, Arizona, Arkansas, California, Florida, Georgia, Illinois, Indiana, Kentucky, Louisiana, Michigan, Mississippi, Missouri, North Carolina, Ohio, Oklahoma, Pennsylvania, South Carolina, Tennessee, Texas, Virginia, and West Virginia.

To pinpoint the nearest Logans Roadhouse, the most reliable method is to utilize the official Logans Roadhouse store locator available on their website. This tool allows you to search by city, state, or zip code, providing a comprehensive list of nearby restaurants along with their addresses, phone numbers, and operating hours. Alternatively, popular map applications like Google Maps or Apple Maps can also be employed to search for “Logans Roadhouse” in your area, offering directions and additional information.

Visiting a Logans Roadhouse provides the opportunity to experience their full menu, including those incredibly popular yeast rolls fresh from the oven, alongside their signature steaks and other American favorites.

Checking Your Logans Gift Card Balance

Logans Roadhouse gift cards offer a convenient way to enjoy their delicious meals and, of course, those famous yeast rolls! Keeping track of your gift card balance is simple, ensuring you maximize its value during your next visit. Logans provides two straightforward methods for checking your remaining balance.

The quickest and most convenient option is to utilize the online balance checker available on the Logans Roadhouse website. You’ll need to enter both the gift card number and the PIN located on the back of the card. This will instantly display your current balance. However, if your gift card doesn’t have a visible PIN, don’t worry!

You can easily visit any Logans Roadhouse restaurant location and a team member will be happy to check the balance for you in person. This ensures you always know how much you have available to spend on your favorite Logans Roadhouse treats, including those tempting take and bake rolls!

canon sx50 hs instruction manual

The Canon PowerShot SX50 HS offers a comprehensive user guide (pssx50hs-cug-en.pdf‚ 41.96MB‚ version 1.0) detailing its features.

This manual‚ issued in 2012‚ assists users in maximizing the camera’s potential‚ from initial setup to advanced photography techniques.

Overview of the Camera

The Canon PowerShot SX50 HS is a versatile superzoom digital camera designed for both beginner and experienced photographers. Its detailed instruction manual (pssx50hs-cug-en.pdf) guides users through its extensive capabilities.

This camera boasts a powerful 50x optical zoom‚ allowing for incredible reach‚ and features a high-resolution sensor for detailed images. The manual covers everything from basic operation to advanced settings‚ ensuring users can fully utilize its potential for capturing stunning photos and videos.

Key Features and Specifications

The Canon SX50 HS‚ as detailed in its user guide (pssx50hs-cug-en.pdf‚ 41.96MB)‚ features a 12.1MP High-Sensitivity CMOS sensor and DIGIC 4+ Image Processor. It offers a 50x optical zoom lens (22.2–1106mm) and Intelligent IS for stabilized shooting.

Key specs include 1080p Full HD video recording‚ manual controls‚ and various shooting modes. The manual thoroughly explains these features‚ enabling users to optimize image quality and creative expression.

Getting Started

Begin your journey with the Canon SX50 HS by referencing the comprehensive user guide (pssx50hs-cug-en.pdf) for unboxing‚ setup‚ and battery information.

Unboxing and Initial Setup

Carefully unpack your Canon PowerShot SX50 HS‚ ensuring all included accessories are present – the camera body‚ battery‚ battery charger‚ and the comprehensive user manual (pssx50hs-cug-en.pdf).

Before first use‚ thoroughly review the manual to understand component identification and proper handling. Insert the battery as detailed within the guide‚ and connect the charger to a suitable power source.

Follow the on-screen prompts for initial setup‚ including language selection‚ date/time configuration‚ and SD card formatting. This ensures optimal performance from the start.

Battery Information & Charging (ED05F-08-8 Lithium-Ion Battery)

The Canon SX50 HS utilizes the ED05F-08-8 Lithium-Ion battery‚ a Sony-produced US18650V3 cell (UL1642 certified). Optimal performance requires proper charging procedures detailed in the user manual (pssx50hs-cug-en.pdf).

Typical capacity is around 2.5Ah‚ though some cells may display 15 on their casing‚ indicating approximately 1500mAh.

Always use the supplied charger to avoid damage and ensure battery longevity. Avoid extreme temperatures during charging and storage.

Inserting and Removing the Battery

To insert the ED05F-08-8 battery into your Canon SX50 HS‚ locate the battery compartment latch on the camera’s bottom. Release the latch and slide the battery in until it clicks securely.

To remove‚ slide the release button on the battery itself while gently lifting it out.

Refer to the full user guide (pssx50hs-cug-en.pdf) for detailed diagrams and safety precautions regarding battery handling and proper insertion/removal techniques.

Understanding the Camera Controls

The Canon SX50 HS features a mode dial and various buttons for operation. The user guide (pssx50hs-cug-en.pdf) details each control’s function for optimal use.

Power Button and Mode Dial

The Power Button initiates camera operation‚ while the Mode Dial selects shooting modes like Auto‚ Scene‚ or Manual. Refer to the comprehensive user guide (pssx50hs-cug-en.pdf) for detailed explanations.

Understanding the Mode Dial’s positions—including Program‚ Shutter Priority‚ Aperture Priority‚ and Movie—is crucial. The manual clarifies each mode’s function‚ enabling users to tailor settings to specific photographic scenarios. Proper use unlocks the SX50 HS’s full potential.

Button and Dial Functions

The Canon SX50 HS features various buttons and dials controlling zoom‚ shutter‚ menu navigation‚ and function settings. The detailed user guide (pssx50hs-cug-en.pdf) provides a complete breakdown of each control’s purpose.

Mastering these functions—including the control wheel and dedicated buttons—allows for efficient operation. The manual illustrates button layouts and explains customizable options‚ enhancing user experience and photographic control. Familiarity with these controls is key to maximizing the camera’s capabilities.

Navigating the Menu System

The Canon SX50 HS utilizes an intuitive menu system accessed via the MENU button. The comprehensive user guide (pssx50hs-cug-en.pdf) details each menu tab and its associated settings‚ covering shooting‚ playback‚ and setup options.

Users can navigate using the directional buttons and SET button. Understanding the menu structure—including customization options—is crucial for tailoring the camera to individual preferences and unlocking its full potential for diverse photographic scenarios.

Shooting Modes

The Canon SX50 HS offers Auto‚ Scene (Portrait‚ Landscape‚ Sports)‚ and Manual modes‚ detailed in the user guide (pssx50hs-cug-en.pdf) for versatile shooting.

Auto Mode for Beginners

Auto mode on the Canon SX50 HS simplifies photography for newcomers‚ automatically adjusting settings for optimal results. The comprehensive user guide (pssx50hs-cug-en.pdf) explains this mode’s ease of use‚ ideal for everyday snapshots. It intelligently detects scenes‚ optimizing focus‚ exposure‚ and ISO.

This eliminates the need for manual adjustments‚ allowing users to instantly capture quality images without prior photography knowledge‚ making it perfect for casual shooting.

Scene Modes (Portrait‚ Landscape‚ Sports‚ etc.)

The Canon SX50 HS features diverse Scene Modes – Portrait‚ Landscape‚ Sports‚ and more – tailored for specific shooting conditions. The user guide (pssx50hs-cug-en.pdf) details each mode’s function‚ optimizing camera settings for best results.

Portrait mode enhances skin tones‚ Landscape prioritizes sharpness and vivid colors‚ while Sports freezes action. These presets simplify achieving professional-looking photos without manual adjustments‚ offering creative control.

Manual Mode for Advanced Users

Manual Mode on the Canon SX50 HS grants complete control over settings like aperture‚ shutter speed‚ and ISO. The camera’s user guide (pssx50hs-cug-en.pdf) thoroughly explains each parameter and their interplay.

This mode empowers experienced photographers to fine-tune images‚ achieving desired effects unattainable in automatic modes. Mastering Manual Mode unlocks creative potential‚ allowing precise adjustments for challenging lighting or artistic vision.

Focusing and Image Quality

The SX50 HS’s manual (pssx50hs-cug-en.pdf) details autofocus modes and image quality settings. Users can adjust resolution and compression for optimal results.

Autofocus Modes and Settings

The Canon SX50 HS manual (pssx50hs-cug-en.pdf) comprehensively explains the camera’s autofocus (AF) system. It details various AF modes‚ including Single‚ Continuous‚ and Manual Focus. Users can select AF point selection methods – Face+Tracking‚ Flexible Point‚ and Center.

The guide clarifies AF lock functions and how to utilize focus area settings for precise image capture. Understanding these settings is crucial for achieving sharp‚ well-focused photographs in diverse shooting scenarios‚ as outlined within the detailed documentation.

Image Size and Quality Settings

The Canon SX50 HS manual (pssx50hs-cug-en.pdf) provides a detailed explanation of image size and quality options. Users can choose from various resolutions‚ impacting file size and detail. Quality settings include Super Fine‚ Fine‚ and Normal‚ influencing compression levels.

The guide clarifies the implications of each setting‚ helping photographers balance image quality with storage capacity. Selecting appropriate settings ensures optimal results for intended use‚ whether printing or digital display‚ as detailed in the comprehensive manual.

Zoom Functionality

The Canon SX50 HS boasts a powerful 50x optical zoom‚ extensively covered in the user manual (pssx50hs-cug-en.pdf). The guide details how to utilize the zoom lever for precise framing. Digital zoom extends reach further‚ though with potential image quality reduction.

The manual explains zoom speed adjustments and the Dynamic IS feature‚ stabilizing images during zoomed-in shots. Mastering these functions‚ as outlined‚ unlocks the camera’s full photographic potential.

Using the Flash

The Canon SX50 HS manual (pssx50hs-cug-en.pdf) details flash modes: Auto‚ On‚ Off‚ and Slow Sync‚ alongside red-eye reduction techniques for optimal results.

Flash Modes (Auto‚ On‚ Off‚ Slow Sync)

The Canon SX50 HS manual comprehensively explains the available flash modes. Auto mode intelligently determines when flash is needed‚ balancing ambient and artificial light. On mode forces the flash to fire with every shot‚ ideal for dark environments.

Off mode disables the flash entirely‚ relying solely on existing light. Slow Sync combines a slower shutter speed with the flash‚ capturing more ambient light and creating a natural look – perfect for nighttime scenes. Understanding these modes‚ as detailed in pssx50hs-cug-en.pdf‚ is crucial for achieving desired photographic effects.

Red-Eye Reduction

The Canon SX50 HS manual details the red-eye reduction feature‚ designed to minimize the appearance of red pupils in flash photography. This function works by emitting a series of pre-flashes before the main flash‚ constricting the subject’s pupils.

The manual (pssx50hs-cug-en.pdf) explains how to enable or disable this setting within the camera’s menu. While effective‚ it’s noted that red-eye reduction isn’t foolproof and may not eliminate the effect entirely in all situations‚ particularly with certain individuals.

Video Recording

The Canon SX50 HS manual (pssx50hs-cug-en.pdf) outlines video recording settings and sound options for capturing high-quality moving images with the camera.

Video Recording Settings

The Canon SX50 HS manual (pssx50hs-cug-en.pdf) details various video recording settings. Users can adjust resolution (including Full HD 1920×1080) and frame rates (30p‚ 60p) to suit their needs. The manual explains how to enable or disable image stabilization during video capture‚ ensuring smooth footage.

Furthermore‚ it covers options for wind noise reduction and dynamic IS for stable handheld recording. Understanding these settings‚ as outlined in the guide‚ is crucial for optimal video quality.

Sound Recording Options

The Canon SX50 HS instruction manual (pssx50hs-cug-en.pdf) explains the camera’s sound recording capabilities during video capture. Users can select from automatic or manual audio level adjustment. The manual details how to connect an external microphone for improved sound quality.

It also covers the wind noise reduction feature‚ minimizing unwanted background sounds. Proper configuration of these options‚ as described in the guide‚ significantly enhances the overall audio experience.

Connectivity and Transferring Images

The Canon SX50 HS manual (pssx50hs-cug-en.pdf) details connecting to computers via USB and utilizing SD cards for easy image transfer and storage.

Connecting to a Computer

The Canon SX50 HS user guide (pssx50hs-cug-en.pdf) explains connecting your camera to a computer using a USB cable. This allows for direct image transfer and potential use of the camera as a webcam‚ depending on software compatibility.

The manual details the necessary drivers and procedures for both Windows and Mac operating systems‚ ensuring a smooth connection. It also covers troubleshooting steps for common connectivity issues‚ like the camera not being recognized by the computer.

Using SD Cards

The Canon SX50 HS manual (pssx50hs-cug-en.pdf) thoroughly covers SD card usage. It specifies compatible SD card types – likely SD‚ SDHC‚ and potentially SDXC – and maximum supported capacities. The guide details proper insertion and removal procedures to prevent data corruption or damage to the card slot.

Formatting SD cards directly through the camera’s menu is recommended for optimal performance. The manual also addresses troubleshooting steps for card errors.

Troubleshooting Common Issues

The Canon SX50 HS manual (pssx50hs-cug-en.pdf) addresses issues like the camera not powering on or focusing problems‚ offering potential solutions for users.

Camera Not Turning On

If your Canon SX50 HS fails to power on‚ the official user guide (pssx50hs-cug-en.pdf) suggests checking the battery first. Ensure it’s correctly inserted and fully charged using the ED05F-08-8 Lithium-Ion Battery charger.

Verify the battery contacts are clean and free of obstruction. If the issue persists‚ try a different‚ known-good battery. A malfunctioning battery or improper connection are common causes‚ as detailed within the manual’s troubleshooting section.

Focusing Problems

Experiencing focusing issues with your Canon SX50 HS? The user guide (pssx50hs-cug-en.pdf) recommends verifying the selected autofocus (AF) mode. Ensure it’s appropriate for your subject – single‚ continuous‚ or face detection.

Check sufficient lighting conditions‚ as low light can hinder autofocus performance. Clean the lens thoroughly. If problems continue‚ try manually focusing using the manual focus option detailed in the manual’s focusing section.

Downrigger Issues (Canno uni-troll 6)

This section addresses a separate product – the Canno uni-troll 6 downrigger – and is unrelated to the Canon SX50 HS camera or its instruction manual (pssx50hs-cug-en.pdf). Users report issues with the downrigger failing to tighten after reaching the desired depth.

This suggests a potential mechanical problem within the reel or tensioning system‚ requiring separate troubleshooting resources specific to the Canno uni-troll 6‚ not the camera’s guide.

User Guide Resources (pssx50hs-cug-en.pdf)

The official Canon PowerShot SX50 HS user guide (pssx50hs-cug-en.pdf) is a 41.96MB document‚ issue number 0300870001‚ version 1.0.

Accessing the Digital Manual

The Canon PowerShot SX50 HS digital manual‚ identified as ps sx50hs-cug-en.pdf‚ provides comprehensive guidance for camera operation. This resource‚ weighing in at 41.96 MB‚ is readily available online through Canon’s official support website or various photography resource platforms.

Users can easily download and view the manual on their computers‚ tablets‚ or smartphones‚ eliminating the need for a physical copy. The document‚ version 1.0 and issue number 0300870001‚ offers detailed explanations and illustrations to assist users in understanding all aspects of the camera.

File Version and Size Information

Regarding the Canon SX50 HS instruction manual (pssx50hs-cug-en.pdf)‚ specific details regarding its digital format are readily available. The file currently exists as version 1.0‚ designated by issue number 0300870001. Its substantial size of 41.96 MB reflects the comprehensive nature of the documentation.

This large file size accommodates detailed explanations‚ numerous illustrations‚ and a complete index‚ ensuring users have access to all necessary information for optimal camera utilization and troubleshooting.

Advanced Settings

The Canon SX50 HS manual details customization options‚ including white balance adjustments‚ allowing experienced photographers to fine-tune image characteristics for optimal results.

Customizing Camera Settings

The Canon SX50 HS manual provides extensive options for tailoring the camera to individual preferences. Users can adjust image quality‚ autofocus behavior‚ and various shooting parameters.

Explore menu settings to personalize button functions‚ display information‚ and sound effects. Custom White Balance allows precise color control‚ while My Modes store preferred settings for quick recall. These customizations enhance workflow and creative control‚ enabling photographers to optimize the camera for specific shooting scenarios and personal styles.

White Balance Adjustment

The Canon SX50 HS manual details several White Balance settings for accurate color reproduction. Auto White Balance (AWB) generally suffices‚ but Custom WB offers precise control.

Users can select presets like Daylight‚ Cloudy‚ or Tungsten‚ or manually set a value using a white card. Correct white balance ensures colors appear natural under various lighting conditions‚ preventing unwanted color casts. Mastering this feature is crucial for achieving professional-looking images with accurate and pleasing tones.

Maintenance and Care

The Canon SX50 HS manual recommends gentle lens and body cleaning with a soft cloth. Proper storage protects the camera from dust and potential damage.

Cleaning the Lens and Body

To maintain optimal image quality‚ regularly clean the Canon SX50 HS lens using a soft‚ lint-free cloth. Gently wipe away fingerprints‚ dust‚ and smudges in a circular motion. Avoid using excessive pressure or harsh chemicals‚ as these can damage the lens coating.

For the camera body‚ use a slightly damp cloth to remove dirt and grime. Ensure the cloth is wrung out thoroughly to prevent moisture from entering the camera. Never use solvents or abrasive cleaners on any part of the SX50 HS.

Storage Recommendations

Proper storage extends the lifespan of your Canon SX50 HS. When not in use‚ store the camera in a cool‚ dry place‚ away from direct sunlight and extreme temperatures. A dedicated camera bag offers excellent protection against dust‚ impacts‚ and moisture.

Remove the battery when storing for extended periods to prevent potential leakage or corrosion. Keep the battery in a dry location‚ separate from metal objects‚ to avoid short circuits.

coloplast titan instructions for use

Coloplast Titan Inflatable Penile Prosthesis: A Comprehensive Guide

This guide details the Coloplast Titan, emphasizing adherence to physician instructions and the device manual for optimal safety and functionality.

The Coloplast Titan Inflatable Penile Prosthesis represents a significant advancement in treating erectile dysfunction (ED). Designed for men who haven’t found success with other treatments, the Titan offers a discreet and reliable solution for restoring sexual function. Understanding its operation and adhering to provided instructions are paramount for achieving optimal results and long-term satisfaction.

Coloplast, a globally recognized healthcare company, has engineered the Titan with a focus on both functionality and patient well-being. The system’s innovative design aims to mimic the natural erectile process, providing firmness for intercourse and allowing for a return to flaccidity when desired. It’s crucial to remember that individual experiences may vary, and careful consideration of the product’s Instructions for Use is essential.

This guide serves as an introductory overview, but it is not a substitute for the detailed information contained within the official Coloplast Titan device manual and your physician’s specific guidance.

What is the Coloplast Titan Inflatable Penile Prosthesis?

The Coloplast Titan is a three-part, inflatable penile prosthesis designed to restore erectile function. It consists of inflatable cylinders implanted within the corpora cavernosa of the penis, a pump implanted in the scrotum, and a reservoir placed in the abdomen. This system allows the user to control when and for how long an erection is maintained.

Unlike semi-rigid implants, the Titan provides a more natural feel and appearance, being flaccid when not in use. Activation involves manually pumping fluid from the reservoir into the cylinders, creating an erection. Detailed instructions for proper operation are provided by your physician and are critical for successful use.

The Titan’s One-Touch release pump is a key feature, enabling quick deflation. Always refer to the device manual for comprehensive information regarding the implant and its intended use, as risks and results can vary.

Components of the Titan System

The Coloplast Titan Inflatable Penile Prosthesis comprises three essential components working in harmony. First, paired inflatable cylinders, crafted from silicone, are surgically placed within the corpora cavernosa, responsible for achieving rigidity. Secondly, the One-Touch release pump, situated within the scrotum, facilitates inflation and deflation via fluid transfer.

Finally, a reservoir, typically implanted in the lower abdomen, stores the sterile fluid necessary for inflation. These components are interconnected by tubing, creating a closed hydraulic system. Understanding each part’s function is crucial for proper operation.

The Coloplast logo is a registered trademark. Detailed information regarding each component, including materials and specifications, can be found within the device manual. Always consult your physician and the Instructions for Use for complete guidance.

Understanding the Titan System Operation

The Titan system utilizes a simple, reliable mechanism for achieving and maintaining an erection, relying on fluid transfer and user-controlled activation.

How the One-Touch Release Pump Works

The Coloplast Titan’s One-Touch release pump is designed for intuitive operation, enabling discreet control over inflation and deflation. This innovative pump, typically located in the scrotum, facilitates a natural-feeling erection with minimal effort. Activation involves a simple, single-touch action to initiate fluid transfer from the reservoir to the cylinders within the penis.

Understanding the pump’s mechanics is crucial for successful use. The pump contains a valve system that directs fluid flow. Repeated squeezes of the pump progressively inflate the cylinders, achieving the desired level of rigidity. It’s important to note that consistent, firm pressure is required for optimal function. The pump’s design prioritizes user comfort and ease of use, contributing to a positive experience. Refer to the device manual for detailed illustrations and operational guidance.

Inflation and Deflation Mechanism

The Coloplast Titan utilizes a sophisticated, two-part mechanism for achieving and releasing an erection. Inflation is initiated by activating the One-Touch release pump, transferring fluid from a reservoir—typically implanted in the abdomen—into the paired inflatable cylinders within the penile shafts. This fluid displacement creates rigidity, mimicking a natural erection.

Deflation is equally straightforward, employing a dedicated release valve. By applying firm and steady pressure to the squeeze release bars located near the pump, the fluid is returned to the reservoir, restoring a flaccid state. Continuous pressure on these bars is essential for complete deflation. This dual-action system allows for controlled erections and discreet return to flaccidity, enhancing both functionality and confidence. Always consult the product’s Instructions for Use for detailed diagrams and operational specifics.

Achieving Flaccidity – Squeeze Release Technique

Returning to a flaccid state with the Coloplast Titan relies on the effective use of the squeeze release technique; This involves firmly and steadily squeezing the penis at the base, near the pump, utilizing the integrated release bars. It’s crucial to maintain continuous pressure during this process; intermittent squeezing may not fully deflate the cylinders.

Gentle squeezing can also expedite deflation. This technique encourages fluid to return to the abdominal reservoir, restoring a natural, relaxed state. Mastering this technique is vital for discreet control and comfort. Remember, consistent practice and adherence to the Instructions for Use are key to achieving optimal results. If difficulties persist, consult your physician for personalized guidance and troubleshooting.

Pre- and Post-Operative Instructions

Following your physician’s detailed instructions before and after surgery is paramount for a successful outcome and optimal device function, as outlined in the manual.

Physician’s Instructions – Importance of Adherence

Your surgeon’s specific instructions are absolutely critical for achieving the best possible results with the Coloplast Titan inflatable penile prosthesis. These guidelines cover pre-operative preparation, including medication adjustments and hygiene protocols, designed to minimize infection risk. Post-operatively, diligent wound care, activity restrictions, and follow-up appointments are essential for proper healing and device integration.

Understanding and strictly adhering to these instructions significantly impacts the long-term functionality and reduces the potential for complications. The physician will provide detailed guidance on operating the prosthesis, including the one-touch release pump mechanism and the squeeze-release technique for achieving flaccidity.

Furthermore, the doctor will explain potential risks and troubleshooting steps for pseudo-malfunctions, emphasizing the importance of referencing the complete device manual for comprehensive information. Ignoring these instructions can compromise the implant’s performance and your overall satisfaction.

Post-Implant Care and Recovery

Following implantation, diligent post-operative care is paramount for successful recovery and optimal device function. Initial recovery involves managing discomfort with prescribed medication and adhering to wound care instructions to prevent infection. Activity restrictions, typically avoiding strenuous exercise and sexual intercourse for a specified period, are crucial for proper tissue healing and implant stabilization.

Regular follow-up appointments with your physician are essential to monitor healing progress and address any concerns. You’ll receive detailed instructions on operating the Titan prosthesis, including the one-touch release pump and the squeeze-release technique.

Understanding potential issues like pseudo-malfunctions and knowing when to consult your doctor is vital. Always refer to the device manual for comprehensive guidance and remember that individual recovery timelines vary. Patience and consistent adherence to your physician’s advice are key to a positive outcome.

Potential Risks and Complications

While generally safe, the Titan implant carries risks; review the Instructions for Use carefully, as experiences and results may vary based on clinical judgment.

Common Risks Associated with Penile Implants

Penile implants, including the Coloplast Titan, while effective, are associated with potential risks that patients should understand before proceeding. These can range from mechanical issues to infection and device-related complications. The Instructions for Use thoroughly detail these possibilities, emphasizing the importance of careful consideration and open communication with your physician.

Infection is a primary concern, requiring diligent post-operative care. Mechanical failures, though infrequent, can occur, potentially necessitating revision surgery. Other risks include erosion, where the device wears through the skin, and component malfunction. Pain, changes in sensation, and dissatisfaction with cosmetic results are also possible.

It’s crucial to remember that individual experiences vary, and the likelihood of these risks depends on factors like overall health and surgical technique. Thoroughly reviewing the product’s Instructions for Use and discussing concerns with your doctor is paramount for informed decision-making and managing expectations.

Pseudo-Malfunction and Troubleshooting

A “pseudo-malfunction” with the Coloplast Titan inflatable penile prosthesis refers to a perceived device failure that isn’t a true mechanical issue. Often, this involves difficulty inflating or deflating the implant, causing anxiety for the user. The product’s Instructions for Use dedicate specific guidance to identifying and resolving these situations.

Common causes include inadequate pump activation, insufficient squeeze release technique, or temporary fluid shifts within the system. Before assuming a mechanical problem, patients should meticulously follow the operating steps outlined in the manual. Ensure firm, steady pressure on the release pump and consistent squeezing for deflation.

If issues persist, consulting the Instructions for Use for troubleshooting tips is vital. Avoid forceful manipulation, which could potentially damage the device. If the problem continues, immediate contact with your physician is recommended to rule out genuine mechanical failure or infection.

Detailed Usage Guidelines

Proper operation involves following the step-by-step instructions provided by your doctor and referencing the device manual for optimal functionality and long-term care.

Operating the Release Pump – Step-by-Step

To initiate inflation, firmly locate the One-Touch release pump, typically situated within the scrotum. A distinct click signifies activation, allowing fluid transfer from the reservoir to the cylinders. Repeated clicks incrementally increase rigidity, enabling personalized firmness control. For deflation, gently squeeze the release bars with consistent, firm pressure.

Maintain continuous pressure on these bars to achieve complete flaccidity; intermittent squeezing may prolong the process. Remember, the pump’s responsiveness can vary, so practice is key to mastering controlled inflation and deflation. Always consult the device manual for detailed illustrations and troubleshooting guidance. Understanding this process ensures comfortable and discreet operation of your Coloplast Titan prosthesis, maximizing its benefits and your confidence.

Maintaining Optimal Functionality

Regular, gentle cycling of the prosthesis – inflating and deflating – is crucial for maintaining fluid movement and preventing potential adhesion within the system. This proactive approach helps ensure consistent performance and responsiveness over time. Avoid forceful or abrupt movements during operation, as these could potentially strain the components.

Routine follow-up appointments with your physician are essential for monitoring the implant’s function and addressing any concerns promptly. Familiarize yourself with the signs of a pseudo-malfunction and consult the device manual for troubleshooting steps. Proper care and consistent use, guided by your doctor’s instructions, will contribute significantly to the longevity and reliable operation of your Coloplast Titan inflatable penile prosthesis.

Long-Term Care and Monitoring

Consistent adherence to your physician’s recommended follow-up schedule is paramount for long-term success with the Coloplast Titan. These appointments allow for proactive assessment of the implant’s mechanical function and identification of any potential issues. Be prepared to discuss any changes in performance or discomfort experienced.

Maintain open communication with your healthcare provider regarding any concerns, even seemingly minor ones. Familiarity with the product’s Instructions for Use is vital, enabling you to recognize normal operation versus potential complications. Remember that risks and results can vary, so personalized monitoring is key. Lifelong commitment to proper care ensures optimal functionality and quality of life with your prosthesis.

Important Safety Information

Always reference the Coloplast Titan device manual and Instructions for Use to fully understand intended use, safety precautions, and potential adverse events.

Referencing the Device Manual

The Coloplast Titan inflatable penile prosthesis device manual is a crucial resource for both patients and physicians. It contains detailed information regarding the implant’s components, proper operation, and troubleshooting guidance. Thoroughly reviewing the manual before and after implantation is essential for understanding the system’s functionality and maximizing its benefits.

Specifically, the manual outlines the correct technique for operating the one-touch release pump, achieving inflation and deflation, and utilizing the squeeze release technique for flaccidity. It also details potential risks, complications, and how to identify and address pseudo-malfunctions.

Furthermore, the manual provides comprehensive instructions for post-implant care, including hygiene recommendations and monitoring for any adverse events. Always consult the manual for the most up-to-date information and adhere to the recommended guidelines to ensure optimal long-term performance and patient satisfaction. Risks and results may vary.

Understanding the Instructions for Use

The Coloplast Titan’s Instructions for Use (IFU) are paramount for safe and effective operation. These instructions, provided by your physician, detail the precise steps for utilizing the inflatable penile prosthesis. Understanding the IFU minimizes risks and maximizes the device’s functionality, ensuring a satisfactory outcome.

The IFU emphasizes the importance of the one-touch release pump, explaining how to achieve controlled inflation and deflation. It specifically details the squeeze release technique, requiring firm, steady pressure for achieving a flaccid state. Continuous pressure is necessary for optimal results.

Furthermore, the IFU outlines potential adverse events and troubleshooting steps for pseudo-malfunctions. It’s vital to familiarize yourself with these scenarios and report any concerns to your doctor promptly; Adherence to the IFU, alongside your physician’s guidance, is key to long-term success and device longevity.

form dd1149 instructions

DD Form 1149 Instructions: A Comprehensive Guide (2026)

DD Form 1149 serves as a crucial requisition and invoice/shipping document within the U.S. Department of Defense. This guide provides detailed instructions for accurate completion and usage, ensuring smooth logistical operations in 2026.

What is DD Form 1149?

DD Form 1149, officially titled “Requisition and Invoice/Shipping Document,” is a standardized form utilized by the United States Department of Defense, specifically within the Army and broader federal logistics network. It functions as a multi-purpose document, consolidating the roles of a requisition, invoice, and shipping document into a single, streamlined form.

Its primary purpose is to facilitate the ordering, receiving, and billing processes for goods and services. The form meticulously details items being shipped, quantities, pricing, and crucial shipping/handling information. It’s a key component in tracking shipments and managing financial transactions related to defense logistics.

The DD Form 1149 isn’t merely a request for goods; it also serves as the official invoice from the supplier and a record of the shipment’s details. The edition date is currently 01/01/2016, and users should ensure they are utilizing the latest applicable version for 2026 to maintain compliance and accuracy. Proper completion is vital for efficient supply chain management.

Purpose of the DD Form 1149

The core purpose of DD Form 1149 is to standardize and streamline the process of requisitioning, invoicing, and documenting shipments within the Department of Defense. It consolidates three separate functions – a purchase request, a seller’s invoice, and a shipping manifest – into one comprehensive document, reducing administrative overhead and potential errors.

Specifically, the form enables requesting activities to clearly define their needs, while simultaneously providing vendors with a standardized invoice format. It also serves as a critical record for tracking shipments, including details on special handling requirements and associated charges. This ensures accountability and transparency throughout the supply chain.

Furthermore, the DD Form 1149 facilitates accurate financial transactions by providing a clear record of agreed-upon pricing and quantities. Its use is essential for managing budgets and ensuring proper allocation of resources. Accurate completion and adherence to instructions are paramount for effective logistics and financial control within the DoD.

Who Uses DD Form 1149?

DD Form 1149 is utilized by a broad spectrum of personnel within the U.S. Department of Defense and related sectors. Primarily, it’s employed by individuals involved in the procurement and supply chain management processes across all branches of the military – Army, Navy, Air Force, Marine Corps, and Space Force.

Specifically, requisitioning personnel initiating purchase requests, vendors submitting invoices for goods or services provided, and shipping/receiving personnel handling the physical movement of items all actively use this form. Personnel responsible for verifying and approving invoices, as well as those managing logistical operations, also rely on the DD Form 1149.

Beyond direct military personnel, contractors supporting DoD activities, federal government agencies, and even certain authorized civilian organizations may also be required to complete or process this document. Essentially, anyone participating in the acquisition, delivery, or payment for goods and services within the DoD supply chain is likely to encounter and utilize the DD Form 1149.

Understanding the Sections of the Form

The DD Form 1149 is divided into distinct blocks, each requiring specific information. These sections cover details like requisition numbers, dates, sender/recipient data, item descriptions, and shipping costs.

Block 1: Requisition/Invoice Number (TCN)

Block 1 of the DD Form 1149 is dedicated to the Transaction Control Number (TCN), a vital 14-character alphanumeric identifier. This number functions as a tracking mechanism throughout the shipment process, allowing for efficient monitoring and accountability. Understanding its composition is key to accurate form completion.

The TCN isn’t randomly generated; it’s structured. The first six characters represent the sender or receiver’s Routing Identifier Code (RUC) or Unit Identification Code (UIC). This uniquely identifies the originating or destination entity. Following these six characters are four digits representing the Julian date – the day of the year the form is created. For example, February 8th, 2026, would be represented as 039 (since it’s the 39th day of the year).

The final four characters (11-14) are available for additional control or guidance, allowing for further specificity within the tracking system. It’s crucial to ensure accuracy when inputting the RUC/UIC and Julian date, as errors can hinder shipment tracking. This TCN will be your primary reference point for all inquiries regarding the shipment.

Block 2: Issue Release Number

Block 2 on the DD Form 1149 is designated for the “Issue Release Number.” This number is specifically assigned by the releasing activity when material is actually issued or shipped. It’s a critical component for internal control and reconciliation processes within the Department of Defense supply chain. Unlike the TCN, which is generated at the form’s inception, the Issue Release Number is populated after the physical release of goods.

This number provides a direct link between the requisition (represented by the TCN) and the actual shipment. It allows for verification that the correct items, in the correct quantities, have been dispatched according to the original request. The format and length of the Issue Release Number can vary depending on the specific issuing agency’s internal procedures.

Therefore, it’s essential to obtain this number directly from the releasing authority and accurately transcribe it onto the DD Form 1149. Leaving this block blank or entering incorrect information can cause delays in processing and potential discrepancies in inventory management. Accurate completion of Block 2 is paramount for a seamless logistical workflow.

Block 3: Date

Block 3 of the DD Form 1149 requires the entry of the date the form is prepared or the date the shipment is initiated. This date is crucial for establishing a clear timeline throughout the requisition and shipping process. It serves as a reference point for tracking the document’s journey and verifying the timeliness of actions taken at each stage.

The date should be recorded in MM/DD/YYYY format – for example, 02/08/2026, reflecting today’s date as of the provided information. Consistency in date formatting is vital to avoid confusion and ensure compatibility with automated data processing systems. This date is distinct from the Julian date incorporated within the TCN (Transaction Control Number).

Accurate dating is essential for inventory control, financial reporting, and audit trails. It allows for precise monitoring of lead times and identification of potential bottlenecks in the supply chain. Ensure the date entered accurately reflects when the form is being actively processed and the shipment is commencing. A correctly dated DD Form 1149 contributes to efficient and transparent logistics.

Completing the Form: A Step-by-Step Guide

Completing the DD Form 1149 involves carefully filling out each block with accurate information. Online tools simplify this process, offering a user-friendly way to input and print the document.

Filling Out Block 4: From/Sender Information

Block 4 of the DD Form 1149 requires precise sender details. Begin by clearly indicating the complete “From” or sender’s name. This should match the official record of the originating entity. Next, provide the complete mailing address, including street address, city, state, and ZIP code. Accuracy here is paramount for proper delivery and correspondence.

Crucially, include the sender’s Routing Identifier Code (RUC) or Unit Identification Code (UIC). This alphanumeric code, typically long, uniquely identifies the sending organization within the Department of Defense logistics system. The RUC/UIC is a vital component of the Transportation Control Number (TCN), ensuring traceability throughout the shipping process. Double-check this code for errors, as even a single incorrect character can cause delays or misdirection.

Finally, include a contact phone number and email address for the sender. This allows for immediate communication regarding the shipment if any issues arise during transit. Providing complete and accurate “From” information in Block 4 is the first step towards a successful and traceable shipment using the DD Form 1149.

Filling Out Block 5: To/Recipient Information

Block 5 of the DD Form 1149 demands meticulous attention to detail regarding the recipient. Begin by entering the complete “To” or receiver’s name, ensuring it aligns with official records. Following this, provide the full mailing address, encompassing street address, city, state, and ZIP code. Precise address information is critical for successful delivery and avoiding logistical complications.

Similar to the sender information, include the recipient’s Routing Identifier Code (RUC) or Unit Identification Code (UIC). This 6-character alphanumeric code uniquely identifies the receiving organization within the DoD supply chain. This code is integral to the Transportation Control Number (TCN) and is essential for tracking the shipment’s progress. Verify the RUC/UIC for accuracy to prevent delivery errors.

Lastly, provide a contact phone number and email address for the recipient. This facilitates prompt communication should any issues arise during shipment. Complete and accurate “To” information in Block 5, alongside Block 4, establishes a clear and traceable delivery path using the DD Form 1149.

Filling Out Block 6: Item Description

Block 6 of the DD Form 1149 requires a comprehensive and unambiguous description of the items being shipped. This section is vital for accurate inventory management and receiving processes. Begin by clearly stating the National Item Identification Number (NIIN), if applicable. The NIIN is a nine-digit code that uniquely identifies each item in the DoD’s logistics system.

Following the NIIN, provide a detailed description of the item, including its part number, manufacturer, size, color, and any other relevant specifications. Avoid vague terms; be as specific as possible. For example, instead of “Tool Set,” write “Mechanic’s Tool Set, 120-Piece, Craftsman #94212.”

Include the item’s condition (e.g., new, used, overhauled). If the item is part of a larger assembly, clearly indicate its relationship to the whole. Accurate and thorough descriptions in Block 6 minimize discrepancies and ensure the recipient receives the correct materials, streamlining the supply chain process and reducing potential delays.

Shipping and Handling Details

Shipping and handling on the DD Form 1149 involves accurately documenting costs and special requirements. This ensures proper reimbursement and safe delivery of goods, adhering to logistical protocols.

Block 7: Quantity, Unit, and Total Price

Block 7 of the DD Form 1149 is dedicated to detailing the financial aspects of the shipment. This section requires precise input regarding the quantity of items being shipped, the unit price for each item, and the calculated total price. Accuracy is paramount, as this information directly impacts invoicing and payment processes.

The “Quantity” field should reflect the actual number of units shipped. The “Unit” field specifies the measurement for the quantity (e.g., each, pounds, meters). The “Unit Price” represents the cost of a single unit. Finally, the “Total Price” is determined by multiplying the quantity by the unit price. Ensure these figures align with the corresponding purchase order or contract.

Carefully review all entries in Block 7 before submitting the form. Discrepancies can lead to payment delays or disputes. Double-check calculations and verify that the unit price matches the agreed-upon rate. Proper completion of this block is essential for a transparent and efficient financial transaction within the Department of Defense supply chain. It’s a critical component of the overall shipping documentation process.

Block 8: Shipping and Handling Charges

Block 8 of the DD Form 1149 meticulously details all costs associated with the transportation and preparation of the shipment. This section is vital for accurate billing and cost allocation within the Department of Defense logistics network. It requires a comprehensive breakdown of all applicable charges.

This block encompasses various fees, including freight charges, packaging costs, insurance premiums, and any special handling fees incurred during the shipping process. Each charge must be clearly itemized and accompanied by a corresponding amount. Ensure all costs are justified and align with established shipping regulations and agreements.

Accurate completion of Block 8 prevents discrepancies in invoicing and ensures proper reimbursement for shipping expenses. Carefully review all charges before submitting the form, verifying that they are legitimate and accurately calculated. Detailed documentation supporting these charges may be required for audit purposes. Proper completion of this block is crucial for maintaining financial accountability and transparency in the supply chain.

Block 9: Special Handling Requirements

Block 9 of the DD Form 1149 is dedicated to outlining any unique or specific instructions necessary for the safe and secure transportation of the shipment. This section is paramount when dealing with sensitive, hazardous, or oversized items requiring specialized attention.

Clearly articulate any specific handling precautions, such as temperature control requirements, fragility warnings, or the need for specialized equipment during loading and unloading. Detail any necessary permits or certifications required for transporting the goods, ensuring full compliance with relevant regulations.

This block should also specify any restrictions on stacking, orientation, or exposure to environmental factors. Detailed instructions minimize the risk of damage or loss during transit. Accurate and comprehensive information in Block 9 ensures that all personnel involved in the shipping process are aware of and adhere to the necessary precautions. Failing to properly detail special handling needs can lead to costly errors and delays.

Important Considerations & Common Errors

Accuracy is vital when completing the DD Form 1149. Common errors include incorrect TCN composition and outdated form versions. Always verify the edition date (01/01/2016) and download the latest fillable PDF.

TCN Composition: Sender/Receiver RUC/UIC & Julian Date

The Transaction Control Number (TCN) on the DD Form 1149 is a 14-character alphanumeric identifier essential for tracking shipments. Understanding its composition is critical for accurate form completion. The first six characters represent the Requisition Unit Code (RUC) or Unit Identification Code (UIC) of either the sending or receiving party. This code uniquely identifies the organization involved in the transaction.

Following the RUC/UIC, characters seven through ten denote the Julian date – the day of the year the form is created. For example, February 8th, 2026, would be represented as 039 (since it’s the 39th day of the year). Accurate Julian date calculation is paramount for proper tracking. The final four characters (11-14) are available for additional guidance or internal control purposes, allowing for further specificity within the tracking system.

This TCN serves as a unique identifier throughout the shipping process, enabling all parties to monitor the shipment’s progress. Incorrect TCN composition can lead to delays and misdirected deliveries, highlighting the importance of meticulous attention to detail when constructing this crucial number. Always double-check the RUC/UIC and Julian date for accuracy before finalizing the form.

Edition Date and Current Versions (01/01/2016)

The current officially recognized edition date for DD Form 1149 is January 1, 2016. While newer years are approaching, utilizing this version remains valid and acceptable for completing requisitions and shipping documentation. It’s crucial to verify you are employing the most up-to-date version to ensure compatibility with current Department of Defense systems and avoid potential processing issues.

Although the form’s core functionality hasn’t fundamentally changed since 2016, staying informed about potential updates is recommended. Regularly checking official sources like DDFORMS.ORG or the Defense Logistics Agency (DLA) website can confirm if a revised version has been released. Using outdated forms might lead to rejection or delays in processing your shipments.

Despite the 2016 date, the form remains applicable for 2026 and beyond until officially superseded. Always prioritize clarity and accuracy when filling out the form, regardless of the edition date. Proper completion, adhering to current instructions, is more important than solely focusing on the version number.

Where to Download the Fillable DD Form 1149 (2026)

Obtaining a fillable DD Form 1149 for use in 2026 is straightforward. The primary and most reliable source is DDFORMS.ORG. This website provides a readily accessible, downloadable PDF version of the form, allowing for direct online completion. You can easily find it by searching “DD Form 1149” on their platform.

Several other websites also offer downloadable versions, but DDFORMS.ORG is the official repository, ensuring you receive the correct and current form. Be cautious when downloading from unofficial sources to avoid potentially outdated or compromised files. Once downloaded, you can utilize standard PDF editing software to fill out the form digitally.

Alternatively, you can access and complete the form online through various PDF editing tools. These tools often provide features like digital signatures and automated form filling. Remember to save a copy of the completed form for your records before printing and submitting it. Ensure the downloaded form is the January 1, 2016 edition.